Posts


 Busy lovin' on this little bug.
Showing posts with label baby. Show all posts
Showing posts with label baby. Show all posts
Friday, October 21, 2011

Thursday, June 2, 2011
Lazy me
Remember how I am pregnant?
Yep, this is pretty much me for the last 5 months...
 Lazy, lazy, lazy.
The good news is I'm finally perking up.
Yesterday we had my ultrasound and... drum roll

Know what that means???
More of this:

And this:

And this:

And we are thrilled (still tired, but thrilled).
A new baby means a nursery and a nursery means I have to move all the other rooms around which means I have 3 rooms to redecorate! WAHOO!! Bring it on!
I've found so many fun ideas and can't wait to get started!
Only problem now is convincing my 7 year old daughter that it is FUN to share a room with your sister!
She is NOT convinced.
Even when I showed her some of my inspiration like this:

Source: dearlillieblog.blogspot.com via Kathryn on Pinterest
Or this:

Source: shannonberrey.com via Kathryn on Pinterest
Or this:

Source: decorpad.com via Kathryn on Pinterest
Or this:

Source: vivafullhouse.blogspot.com via Kathryn on Pinterest
The inspiration is ENDLESS!!
Doesn't it just make you want to get up off your lazy, pregnant, ever-growing behind and paint/ sew/ or craft something? Or at least take a trip to Hobby Lobby!!
It does me!
Bout time my friends.

Tuesday, July 14, 2009
Orange you glad it's Summer Time?!
I have been on a crafting hiatus.
Low and behold, I set up the card table in front of the TV, popped in a movie and I'm back.
I have made headbands and bows in the past but loved the idea of making the flowers fuller by combining several flower to make one that I got from Homemade by Jill. I attached mine to a ribbon covered alagator clip (with hot glue) for now but I love the idea of putting them right on an elastic headband [once she has hair].

Check out her tutorial.. SEW EASY, SEW CHEAP, SEW COMFY!
Still trying to figure out what size t-shirt I will need to make me a pair:)
Time to get cracking on the 92 other items in my ideas folder!

Tuesday, May 12, 2009
Weekend Crafting
I finally found some time (midnight- augh) to finish up some really random crafts I started.

Problem:
A cute cheap outfit (I found at Old Navy for like $3.00) with a message written across the front that I didn't love!
Solution:
A cute cheap outfit with flowers that I do love!

While I was making flowers, I decided she needed a giant flower!
I am loving to applique these days!!

This cute red chair sits up entirely to straight, it needed a pillow!
(a friend made the cute quilt on the back, not me!)
I have wanted to make a little cozy thing for a while now. This is what I came up with using stuff I already had hanging around my craft room!

She seems to like it!

(a friend made the cute quilt on the back, not me!)
I have wanted to make a little cozy thing for a while now. This is what I came up with using stuff I already had hanging around my craft room!

She seems to like it!

It tastes good too!


Wednesday, March 18, 2009
Babylegs
Mine turned out like this...


(gotta love that spit up:)
...stockings too BIG and babies legs too SKINNY.
Still cute though!
I will be purchasing more tomorrow!!
I, like Ashley from makeitandloveit.blogspot.com, thought that parts of this tutorial were just a little bit confusing. So I thought I would do a tutorial of my own because like she mentioned, they are SO easy to make. Honestly, you can make a pair in 5 min.
Here goes: (warning: 1 million pictures!)

All you need is, KNEE HIGH SOCKS, SCISSORS, SEWING MACHINE and THREAD.
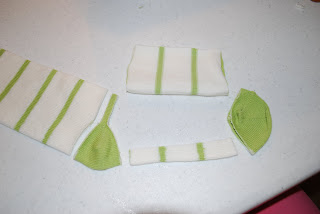
 Make the above 3 cuts in your socks.
 Now make your last cut as shown above. Cut more or less off the bottom to make a bigger or smaller cuff (for older or younger bebes).
 You will now take the larger piece and flip it so the right sides are together.
 Take that same piece (soon to be your cuff) and close the open edge with a zig zag stitch.
 Your cuff is well on it's way. Now turn the long part (leg) inside out.
 Start to turn your cuff right side out... but not all the way.
 Just till it is exactly in half. (folded edge towards the leg, unfinished edge toward the toe).
 Simply slide the leg up so it is even with the cuff.
 Move that cuff closer to the leg.
 Even closer, till it is inside the leg.
 In a little more.
 And just a touch more so all the unfinished edges are together.
 Move that same piece to the sewing machine, place your foot on three layers of fabric (2 cuff, 1 leg) and sew all the way around (line up the right edge of your presser foot with rough edges).
 Since the cuff is a little smaller than the leg, you can pull on the cuff to stretch it a bit while you sew. (Don't stretch the bottom layer.)
 Once you have made it all the way around, go around one more time, this time sew right on the rough edge.
 This is what it will look like.
 Flip out that cuff.
 Now turn it right side out.
 Toss those little scraps and WALAA!!!
 You made BABYLEGS!!!
The blue pair were made exactly the same way, I just cut the sock a little higher above the ankle than the green sock for a shorter BABYLEG.
Let me know what you think and if you need clarification I can do that too!
** Melissa **
Tuesday, November 25, 2008
Car Seat Cover
Like every other craft I make, it is the brain child of someone else... I am just good at copying! I saw these cute car seat covers and being only weeks away from having my first baby (in Utah, in the winter) I had to have one. Theirs were a little fancier with bows or buttons on the straps that attach to the handle and super cute fabric (2 coordinating cotton fabrics sewn right sides together then flipped right side out). I used a cotton and a minke and like the bibs did a rough edge so it will fray.


My fabric was about 36 x 44 with the straps on top being 2 1/2 x 9. If you plan on doing a finished edge you might need a little more for your seam allowance. Good luck!
*Melissa*
Saturday, November 15, 2008
Baby Bibs
Awhile back I saw a darling bib on a little baby and as usual the thought came to me... I could totally make that! So I googled bib patterns and found the following http://chickpeastudio.typepad.com/chickpea_sewing_studio/files/bib_pattern_final.pdf
As you can see they are as easy as can be!


 I used fabric I already had and cut away. I used white thread with a 3/8 seam and plain old straight Velcro that I cut off from a roll. The instruction on the pattern say to sew them right sides together and turn them right side out. You could do that for sure, I personally like it with the rough edges look. I think that is about all, they are pretty self explanatory!
As you can see they are as easy as can be!


 I used fabric I already had and cut away. I used white thread with a 3/8 seam and plain old straight Velcro that I cut off from a roll. The instruction on the pattern say to sew them right sides together and turn them right side out. You could do that for sure, I personally like it with the rough edges look. I think that is about all, they are pretty self explanatory!
And the beautiful thing is the more you wash them the cuter they get!
*Melissa*
Subscribe to:
Posts (Atom)